 Written by:
 Logan Holdaway
(Note: If you haven’t yet set up your local server, you will need to do so before you can install WordPress. Here’s a link on how to do this in ubuntu: https://help.ubuntu.com/community/ApacheMySQLPHP”)
After you have set up your local server, installing a new local WordPress website on your local machine is simple. In this tutorial I will show give you a step by step guide on how to install WordPress to your LAMP server. If you are using WAMP or MAMP you may find the general outline of this tutorial useful, however the individual steps will likely be different for you.
In this tutorial I will use Motate Media as my example. For your actual project you will want to replace motate_media with your project name.
- Create folder in the public_html folder called motate_media
- Download WordPress
- Open the folder you just created in the terminal.
- Download the latest version of WordPress.
wget http://wordpress.org/latest.tar.gz - Extract the files.
tar -xzvf latest.tar.gz - Delete the tar.gz file.
- Cut all contents from wordpress folder and move up one directory.
- Delete the empty folder called wordpress.
- Setup the database
- Log into to MySQL. Enter your MySQL password upon prompt.
mysql -u root -p - Create a database called motate_media.
CREATE DATABASE motate_media; - Grant yourself access, and create a user, and password for your new database.
GRANT ALL PRIVILEGES ON motate_media.* TO "your_username"@"localhost" IDENTIFIED BY "your_password"; - Grant yourself all privileges.
FLUSH PRIVILEGES; - Guess what this does. 😉
EXIT - Set up Apache
-
Create a new file for the Apache server.
sudo cp /etc/apache2/sites-available/000-default.conf /etc/apache2/sites-available/motate_media.conf -
Open new file.
sudo gedit /etc/apache2/sites-available/motate_media.conf - Delete the content and replace it with the following:
<virtualHost *:80> # The ServerName directive sets the request scheme, hostname and port that # the server uses to identify itself. This is used when creating # redirection URLs. In the context of virtual hosts, the ServerName # specifies what hostname must appear in the request's Host: header to # match this virtual host. For the default virtual host (this file) this # value is not decisive as it is used as a last resort host regardless. # However, you must set it for any further virtual host explicitly. ServerName motate_media.local ServerAdmin webmaster@localhost DocumentRoot /home/{your home folder name here}/public_html/motate_media <directory /> Options FollowSymLinks AllowOverride None </directory> <directory /home/{your home folder name here}/public_html/motate_media/> Options Indexes FollowSymLinks MultiViews AllowOverride All Order allow,deny Require all granted Allow from all # This directive allows us to have apache2's default start page # in /apache2-default/, but still have / go to the right place # RedirectMatch ^/$ /index.html </directory> ScriptAlias /cgi-bin/ /usr/lib/cgi-bin/ <directory "/usr/lib/cgi-bin"> Options -Indexes +FollowSymLinks +MultiViews AllowOverride All Require all granted </directory> # Available loglevels: trace8, ..., trace1, debug, info, notice, warn, # error, crit, alert, emerg. # It is also possible to configure the loglevel for particular # modules, e.g. #LogLevel info ssl:warn ErrorLog ${APACHE_LOG_DIR}/error.log CustomLog ${APACHE_LOG_DIR}/access.log combined # For most configuration files from conf-available/, which are # enabled or disabled at a global level, it is possible to # include a line for only one particular virtual host. For example the # following line enables the CGI configuration for this host only # after it has been globally disabled with "a2disconf". Include conf-available/serve-cgi-bin.conf </virtualHost> - Make 3 changes:
The example motate_media is found in the above code three times. Replace it with your project. -
Add the site to Apache server.
sudo a2ensite motate_media.conf -
Reload the Apache server so that the changes are recognized.
sudo service apache2 reload -
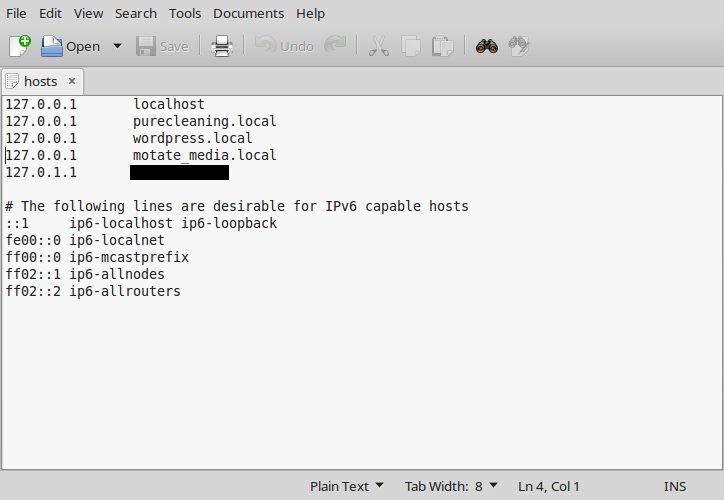
Edit the hosts file.
sudo gedit /etc/hosts - Create a new line with motate_media.local.
- Change permissions
- Install the New WordPress site
- In the Browser go to motate_media.local.
- Click the button >>> Let’s Go.
- Fill in the required info (database name, username, password, localhost) which your set up when you
set up the new database. - Create a new file called wp-config.php in the sites main directory.
- Follow the on screen instructions and copy the code into new file called wp-config.php.
- Go back to browser, click RUN THE INSTALL.
- Create your login information for your new WordPress site.
sudo chmod -R a+rx ~/public_html/motate_media
That’s it! You’re all set. The next step is to install a custom WordPress theme, or to use one of the theme’s provided by WordPress. If you’re looking for a handy theme our number one choice at Motate Media is the FoundationPress theme written by olefredrik. Feel free to check it out for yourself. In some our later posts we will be looking more specifically about using FoundationPress.

FoundationPress